When one of my networks crashed or had errors, I would always wish that I had backed up my network settings before the errors occurred. There were ways of doing this but not as easy as it is today.
Well now with Windows 7 and Windows 8, it is extremely easy to backup your wireless network settings, to save for the just in case times. Even know setting up a wireless network in Windows 7 is very easy, there are still things like a security key that you have to remember and typing manually. Therefore I like to save my wireless network settings and import them back in whenever I need them.
Backup Wireless Network Settings
Follow the steps below to backup your wireless network settings and have the freedom to know that your wireless network can be re-set up within seconds.
468
1. Go to the network and sharing Center in Windows7. You can find the network and sharing Center by clicking on the network icon in the notification area, or by going to the Control Panel in the start menu and clicking on the network icon.
2. In the network and sharing Center, you will see a link that says “manage Wireless networks”. This link will be in the left sidebar. Click on this link.

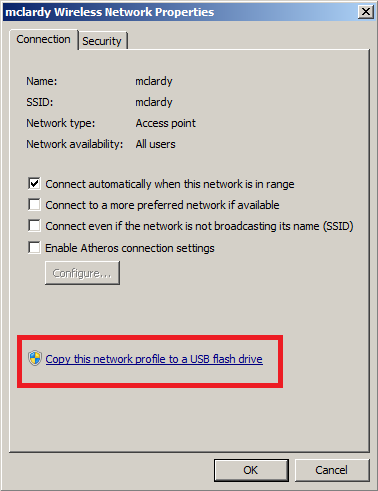
Double-click on the network that you want to backup. This will open up the properties of this network.
4. Go to the connection tab and click on the link that says “copy this network profile to a USB flash drive”. You will find this link at the bottom of the dialogue box.
5. The Copy Network Settings wizard will open. Insert your USB flash drive into a spare slot in your computer. When your USB drive has been detected, click on the next button to start the copying process.
6. This process will only take a few seconds and when it is finished you can press the cross button to close the window.
7. If you go into your USB flash drive you will now see a new folder called SMRTNTKY and a setup fileSNK.exe that was automatically created for you.
Backup Wireless Network Settings in Windows 8 to USB
The process is much the same as the above steps for Windows 8, but the only problem you will have is finding the control panel.
You can open Control Panel in Windows 8 by swiping in from the right edge of the screen, tapping Search (or if you’re using a mouse, pointing to the upper-right corner of the screen, moving the mouse pointer down, and then clicking Search), entering Control Panel in the search box, tapping or clicking Apps, and then tapping or clicking Control Panel.
When in control panel you can then find the Network and Internet section, then Network and sharing.
Import Your Wireless Network Settings
To import the settings that you previously backed up:
1. Simply put your USB drive into a USB port on the computer that you want these settings to be installed to.
2. Then all you have to do is locate the file SNK.exeand double-click on it to start importing the settings. That’s how easy it is.
Now with this fantastic feature that Windows 7 includes, there is no need to try and remember any authentication keys or extremely long numbers to set up your wireless network settings. This is a great help when your network settings have mysteriously changed or disappeared.
(Source by tips4pc.com)
Want more tech news or interesting links? You'll get plenty of both if you keep up with http://tip4d.blogspot.com/ the writer of Computer Tips For Everyday
No comments:
Post a Comment