Showing posts with label General Computer. Show all posts

9/17/13

Tip #116 - 10 Tips To Improve Your Computer Security


Computer security is no joke—the FBI recently arrested a man for child pornography, but when they investigated his computer, it turned out that a computer virus had been downloading the images using his account; in this article we’ll give you 10 tips to improve your computer security that may save you from being dragged out in handcuffs in front of your neighbors.

As I said, this is no joke! You would not wish this on your worst, most annoying neighbor. This just proves that your lack of computer security can interfere with your life, but hopefully not enough to get carted away.

Computer Tips #1: Use Top Anti-Virus Software

There are a lot of anti-virus programs out there, but they’re not all created equal. In order to catch viruses before they infect your computer, anti-virus software needs to know what the virus looks like—this is called the virus’s signature.


It takes a professional security researcher to find virus signatures and some companies that sell generic anti-virus software can’t afford to hire enough security researchers to cover all the viruses. Only the top anti-virus companies and those companies that rely on volunteers have the resources necessary to identify the most recent viruses.

AVG, McAfee, and Symantic (Norton) all make top anti-virus software backed by dozens or hundreds of security researchers whose job it is to identify current viruses. Other software might work, but it might also be too out of date to catch today’s viruses.

Computer Tips #2: Use A Firewall

When other computers try to connect to your computer, it’s the job of your operating system—Microsoft Windows—to handle the connection attempts. But Windows has security flaws. Microsoft tries to fix these flaws as fast as possible, but every time a new flaw appears, hackers can use it to break into your computer.

A firewall changes that. A firewall sits between the Internet and your computer, monitoring the traffic going between them. It looks at every incoming Internet connection to see if you requested it. If you did request it, the firewall lets the connection through. But if you didn’t request it, the firewall blocks it.

Blocking connections you didn’t ask for is simple and takes up only a tiny bit of your computer’s processing power, yet it provides an incredible amount of security, so we highly recommend a firewall for all users everywhere.

 Free Privacy Scan

Computer Tips #3: Use A Router

You probably know that routers let several computers share one Internet connection, but did you ever wonder how they do it? Every time your computer tries to connect to a computer on the Internet through your router, your router adds that connection to its list of open connections.

When the other computer on the Internet responds, your router then needs to figure out which computer it’s responding to, so your router looks at its list and matches the connection to your computer.

But what happens if a computer on the Internet tries connecting to you without you trying to connect to it first? The router doesn’t know what to do because that connection isn’t in its list of connections, so the router simply ignores the connection attempt. That means you router acts like an extra firewall.

But a router is in some ways better than a regular firewall. Routers are dumb, which makes them hard to hack. Even if a hacker finds a fault in your firewall, he’ll still need to get past your dumb router, which increases your security.

Better yet, every connection attempt blocked by your router is a connection attempt your firewall won’t need to block. Blocking connection attempts takes a small amount of computer processing time, which slows down your computer slightly—but blocking thousands of attempts when your computer is under attack can measurably slow down your computer. Your router does all of that work for you without slowing down your computer one bit.

Computer Tips #4: Run A Free Port Scan

The problem with routers and firewalls is that you can’t see them work, so you have to trust that they’re doing their jobs—or do you?

A free port scanning service will pretend to be a hacker trying to connect to your computer. It won’t run any hacker exploits, but it will see if you’re vulnerable. The best part is that port scanners need to be run from other computers on the Internet, so there’s nothing to install on your computer.

I suggest you start with the free port scan provided at SecurityMetrics.com. If you want to try other port scanners, just search Google for “port scan.”

Computer Tips #5: Investigate Problems

Makers of anti-virus software are always trying to track down viruses, so hackers try very hard to hide their code. Often they try to hide viruses in essential parts of Microsoft Windows so the anti-virus software can’t find them, which can cause weird problems.

If you start to see weird problems on your computer—problems you can’t easily explain—take the time to investigate. I know it’s a bother, but most viruses make it easy for other viruses to install themselves, which means that you probably only have a few days from the time you start noticing problems until your computer becomes unusable—or your financial accounts get hacked.

Tracking down most computer problems is usually just a matter of typing the symptoms into Google search and reading the top results. Of course, if you encounter a problem you can’t easily solve, feel free to drop us a line.

Computer Tips #6: Check CPU Use

Viruses are programs, and just like any other program, they need to use your computer’s processor to run. Unlike most other programs, most viruses will try to monopolize computer processor use (CPU).

If you press Ctrl-Alt-Delete in Windows, you’ll be able to open task manager and see the amount of CPU each program uses. If you see a program taking up 80% or more of your CPU and you don’t recognize the program’s name, search Google for its name. The top results on Google will tell you whether its legitimate or a virus.

This method isn’t foolproof—in order to hide from anti-virus software, some viruses will try to hide their CPU use from Windows. However, this will catch many back-door viruses.

Computer Tips #7: Check Running Programs

Some viruses don’t require much CPU—like those viruses that use your computer to send spam email. To detect these viruses, you can use the same method you used to find CPU-intensive viruses—press Ctrl-Alt-Delete and check the program list.

In the program list, look for any programs with suspicious names or names you don’t recognize. If you find a virus, use the End Program or End Task buttons to kill it immediately. Then find the file that was running and place it in the Recycle Bin so it doesn’t autostart the next time your reboot your computer.

Computer Tips #8: Restrict Administrator Access

Installing software on Windows is really easy—that’s one of the things I like about Windows. Unfortunately it might be too easy—even people completely unfamiliar with computer security can install programs.

Not only do you risk catching a computer virus when an uninformed user installs strange programs on your computer, but when every user can install his or her own programs, you’ll never know what should and should not be on your computer.

For households and small businesses where people share computers, I highly recommend only one person have administrator access to install new programs. This applies even when there are several adults in the house. After all, it only seems fair that the person responsible for keeping your computer secure also have the privilege of controlling what software gets installed.

Computer Tips #9: Update Internet Software Frequently

Most threats to your computer come from the Internet, so my next piece of advice should come as no surprise: update Internet software frequently. You could call this software maintenance.

All complicated software has bugs. Internet software is especially complicated, so it has an especially high number of bugs. Many of those bugs are just nuisances, but others are grave security risks. Luckily, most software publishers find out about bugs before hackers can exploit them, and so they publish patches that fix your software.

But that luck turns sour if you fail to install the latest patches, as is the case when you don’t update your Internet software frequently. Updating is easy in most programs, look in the Tools or Help menus of each program for a Check For Updates button and click it. If there are any updates, install them. Try to check for updates every month.

Computer Tips #10: Make Regular Backups

When a virus gets on your computer, it will often install copies of itself into other programs or your documents. That’s one of the reasons it’s so hard to get a virus off of your computer without reinstalling Windows—the virus keeps installing itself again and again.

Backups can’t save you from catching a virus the first time, but they can make recovering much quicker, and they will save you from worrying about whether or not your documents are infected.

Tips4PC has several other great articles about making good secure backups. I suggest you read them, but I also suggest you commit to making a backup of your most important files before you go to bed tonight.  It’s one of the tips most likely to help you sleep.

Install a program to your computer!

A software program will not upgrade your memory but it will clean out all the junk files, detect Malware, delete unused registry keys, Automatic Driver updates, and more. Not taking advantage of the latest updates and security patches can leave your computer vulnerable to attacks. At the moment I am using PC Matic to maintain everything for me. This software is amazing and has won a number of top awards. You can get a free scan for your computer to see how it works before you buy.

(Source by tips4pc.com)

Want more tech news or interesting links? You'll get plenty of both if you keep up with http://tip4d.blogspot.com/ the writer of Computer Tips For Everyday

9/15/13

Tip #115 - How to Deal With the Windows Blue Screen Error?


“Blue” is one of the favorite colors of many people including myself but not when it relates to computer problems. The notorious “blue screen error” also known as the “blue screen error of death (BSOD)” is easily the most dreadful PC problem you will ever come across in your life. And the worst part is, it pops up frequently these days no matter what windows operating system you are using.

The blue screen error has more than one faces – and at least two that I have seen so far. Sometimes the error will show up and the PC will just die, and at other times it will keep rebooting the PC in cycles. If you see the 1st kind of error, an almost dead PC, it is often the less annoying face and easy to deal with. First thing you need to do is cold- restart and see if the error goes away. Most of the time, it will go away for the time being, and you wouldn’t have to worry about it for a while until it reappears a few days later. If you have a laptop, keep pressing the power button until it reboots or take the laptop’s battery off to do a restart.

If your PC on the other hand, keeps rebooting in cycles, this is a bigger problem. Try pressing the “F8” key, to get to the menu from where you can try booting in the safe mode and stop the continuous booting cycle.

Stop the Continuous Booting Cycle

1.  Go to the start menu. Right click on “computer” or “my computer” and select “properties”

2.  Then choose “advanced system settings”. Press “yes” to confirm.

3.  Choose the “advanced” tab on the top menu. Then choose “settings” for “startup and recovery option”. You will get the following screen as in image 1 below.

4.  Deselect “automatically restart” and hit OK. By doing this, you have not fixed the blue screen error! You just stopped the PC reboot again and again.


Perform Checks when in Safe Mode

Go to “start menu” -> “control panel” – > Under “systems and security” select “find and fix problems” -> again “systems and security – the 5th option” -> select “check for performance”. After running this check, the system may recommend some options, like “a list of programs that you should stop running at startup”. Select those programs and go along with systems recommendation to stop those programs automatically run at startup except your antivirus program.

After completion of this performance check, reboot the PC and see if it boots, this time in the regular mode. If it boots alright, 1st thing to do is run a complete virus scan on your system. After the virus scan, go to the systems and security check again mentioned above (the 5th option) and run “fix problems with windows update”. Most of the time windows update will fix problem like this.

Even after doing the update, if you experience the blue screen error, you will need to start your event viewer, identify the problem that is occurring and take it to Microsoft support for a solution. I am going to talk about it little later.
Free PC Matic Scan

The main reason a blue screen error occurs is – resource blockage due to your own system’s limitations or limitations that was created by a virus, malware or a spyware intentionally. Some programs or drivers may create a system bottleneck, and as a result your PC is failing again and again to access its resources that it needs to keep functioning. The PC finds no other option to keep processing with sufficient resources, and dumps all the data into a dump file before going to sleep.

Two Useful Tips – Blue Screen Preventive Actions

- These days, we plug in so many USB devices and Bluetooth wireless devices into our PC or laptop. This is also a major reason for creating resource conflicts and shortages. Better not to use too many USB devices at once unless you really need them all together. More specifically, if you use wireless internet connections to connect to the internet, do not keep your wireless USB modem or the USB dongle plugged in to the USB port, when you start your PC or laptop. Let it start without it first, and when the booting process stops, then connect your USB modem into the slot. This tip is only for those folks who are troubled with this blue screen error, not for everyone.
- Another important point to remember is not to run too many programs at startup. All the programs sitting on the right hand side of your taskbar could easily be a trouble maker. Evaluate if they are all from trustable sources, and if not get rid of them. When you have a program running on taskbar, it means you have given it as much freedom it needs on your PC to do a wide range of things including cracking your system resources if it wishes. If there is one such program that you feel creating some trouble and you also don’t need it much, just take it out of your taskbar and block it for some time and see the result.

How to Run Event Manager to Get Details Information about an Error?

Event manager keeps saving all the events that take place on your PC including errors and warnings. By using event manager properly, we can identify recurrent errors, and get detail information about it. Once we have the detail information, we can try to resolve it by ourselves, a techie or get in touch with Microsoft to have them check it out why it is taking place. Lets walk-you-through the steps on how to use the even manager;

- Go to the start menu and “under search programs and files type “eventvwr” as shown in image 2 below.


- After saying “yes’ on the user account control screen, the event manager windows as shown in image 3 will appear.

- There are five types of events that take places and recorded in your PC. The blue screen error is more likely a system error, so go to the system events. You can see on the right side there are more than 59 thousands system events already recorded in my PC so far. Once you get inside the system events you will see a list of all the events starting from today and ending on the date when your PC was first configured with this operating system. Events that are related with an error or a warning will be marked as shown in image 4 below.


- Considering the blue screen error occurred in your PC just a while ago, try to find this out from the list. It should be right somewhere below, marked in red, and easily identifiable. After you have identified it, click on it and get the detail information on it as shown in image 5 below.


- Now as you have all the information about the error, you will be better equipped to look for a solution. You can search about it on Google or contact an IT expert who can help you with that. You should also contact Microsoft support center here: http://support.microsoft.com/select/?target=hub and ask them for a solution; they might remote login to your PC and fix it for you easily.

(Source by tips4pc.com)

Want more tech news or interesting links? You'll get plenty of both if you keep up with http://tip4d.blogspot.com/ the writer of Computer Tips For Everyday

Tip #114 - Backup Wireless Network Settings in Windows Seven and Eight

Back in the old days, if I had any home network problems, I used to spend hours trying to recreate complicated networks and adjusting wireless network settings. I actually used to play with everything that had anything to do with computers, simply because I loved them.

When one of my networks crashed or had errors, I would always wish that I had backed up my network settings before the errors occurred. There were ways of doing this but not as easy as it is today.

Well now with Windows 7 and Windows 8, it is extremely easy to backup your wireless network settings, to save for the just in case times. Even know setting up a wireless network in Windows 7 is very easy, there are still things like a security key that you have to remember and typing manually. Therefore I like to save my wireless network settings and import them back in whenever I need them.

Backup Wireless Network Settings

Follow the steps below to backup your wireless network settings and have the freedom to know that your wireless network can be re-set up within seconds.

468
1. Go to the network and sharing Center in Windows7. You can find the network and sharing Center by clicking on the network icon in the notification area, or by going to the Control Panel in the start menu and clicking on the network icon.

2. In the network and sharing Center, you will see a link that says “manage Wireless networks”. This link will be in the left sidebar. Click on this link.


3. A new dialogue box will open showing the wireless networks you have connected to in the past.
Double-click on the network that you want to backup. This will open up the properties of this network.
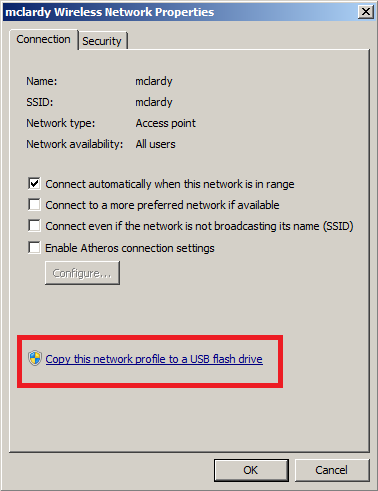
4. Go to the connection tab and click on the link that says “copy this network profile to a USB flash drive”. You will find this link at the bottom of the dialogue box.


5. The Copy Network Settings wizard will open. Insert your USB flash drive into a spare slot in your computer. When your USB drive has been detected, click on the next button to start the copying process.
6. This process will only take a few seconds and when it is finished you can press the cross button to close the window.
7. If you go into your USB flash drive you will now see a new folder called SMRTNTKY and a setup fileSNK.exe that was automatically created for you.

Backup Wireless Network Settings in Windows 8 to USB

The process is much the same as the above steps for Windows 8, but the only problem you will have is finding the control panel.

You can open Control Panel in Windows 8 by swiping in from the right edge of the screen, tapping Search (or if you’re using a mouse, pointing to the upper-right corner of the screen, moving the mouse pointer down, and then clicking Search), entering Control Panel in the search box, tapping or clicking Apps, and then tapping or clicking Control Panel.

When in control panel you can then find the Network and Internet section, then Network and sharing.

Import Your Wireless Network Settings

To import the settings that you previously backed up:

1. Simply put your USB drive into a USB port on the computer that you want these settings to be installed to.

2. Then all you have to do is locate the file SNK.exeand double-click on it to start importing the settings. That’s how easy it is.

Now with this fantastic feature that Windows 7 includes, there is no need to try and remember any authentication keys or extremely long numbers to set up your wireless network settings. This is a great help when your network settings have mysteriously changed or disappeared.

(Source by tips4pc.com)

Want more tech news or interesting links? You'll get plenty of both if you keep up with http://tip4d.blogspot.com/ the writer of Computer Tips For Everyday

9/12/13

Tip #113 - Transform your windows to Macintosh

100 (or more) Computer Tips in 100 (or more) Days

Tip #113 - Transform your windows to Macintosh

Get Lion Transformation pack 1.0 which transforms your Windows OS to Apple's Macintosh OS. It is a nice theme check out some of the screen shots here : -)


Download Link Mediafire

LTP1.zip

Want more tech news or interesting links? You'll get plenty of both if you keep up with http://tip4d.blogspot.com/ the writer of Computer Tips For Everyday

9/10/13

Tip #112 - Printing Specific Pages

100 (or more) Computer Tips in 100 (or more) Days

Tip #112 - Printing - just the pages you want!

So printing may sound like an easy activity. You're looking at the document, you go to the File menu or use your keyboard command (Ctrl p on the PC or Command p on the Apple) and up comes the print dialog box. You click the print button and walk to the printer. Why would I feel the need to write anymore about the topic. Well I was just helping my husband print a variety of pages from a PDF he downloaded and I was able to print five of the eight pages all at the same time. 

Before I printed the document I scrolled through it and realized that he only needed to print some of the pages, the rest were advertisements or instructions that he didn't need. I made note of the pages to print and then brought up the print command. Rather than going with the default "All" pages, you need to click in the "Pages" box. If you want a range, type the first page number followed by a dash and then the last page number. For non consecutive pages, type a page number followed by a comma and then the next page number. As you can see in the screen shot, I wanted to print pages 1, 3 and then 5 through 7. This sure beats printing each page or group of pages separately!

So how easy is that? If you look carefully you will find in all documents the ability to enter specific pages rather than printing the whole document.

Happy Computing!

Diane

Don't forget to click the Subscribe to 100 Computer Tips in 100 Days via email link on the right side of the screen so you get email alerts when Diane adds a new post.

Want more tech news or interesting links? You'll get plenty of both if you keep up with Diane McKeever, the writer of 100 Computer Tips in 100 Days, by subscribing to her Facebook posts or visiting her web page, www.dianemckeever.com . 

8/9/13

Tip #110 - Special Characters on Apple

100 (or more) Computer Tips in 100 (or more) Days

Tip #110 - Special Characters on Apple

My Apple friends have been feeling neglected by my posts. Hopefully they will be happy to find out how to insert special characters (such as accented letters, copyright symbols, foreign language punctuation, etc) into their documents. Here is a printable list so that you can have it handy when you need to insert any of these characters.


You might find that if you just print this page the sheet will print too small. If that's the case you should right-click (Ctrl click) and choose "Save As" to save the picture to your hard drive and then print from there. If you have trouble doing this please send me an email (diane@dianemckeever.com) and I will send a full size version of this chart to you.

If you have an iPad or iPhone you don't need this list. Hold down your finger on any vowel and a list of accented characters will pop up! Brilliant!

Happy Computing

Diane

Don't forget to click the Subscribe to 100 Computer Tips in 100 Days via email link on the right side of the screen so you get email alerts when Diane adds a new post.

Want more tech news or interesting links? You'll get plenty of both if you keep up with Diane McKeever, the writer of 100 Computer Tips in 100 Days, by subscribing to her Facebook posts or visiting her web page, www.dianemckeever.com . 

8/5/13

Tip #109 - Gmail Changes

100 (or more) Computer Tips in 100 (or more) Days

Tip #109 - Gmail Changes

One of the things I love about the Google folks is that they are always trying to think up ways that they feel can improve your computer experience.  You may not agree that all of their "improvements/changes" are better but generally you have a choice of whether or not
you want to implement these changes. I was looking at my Gmail settings, something I recommend you do occasionally. When I clicked on the gear icon in the upper right of the Gmail screen I noticed "Configure Inbox" was a choice. I didn't remember seeing that before so I clicked on it.


The resulting dialog box was very interesting. It was offering me the opportunity to have tabs appear along the top of my Gmail inbox. I checked off a few of the choices and then clicked on the Save button. Lo and behold my inbox had tabs along the top and emails in each of the newly created tabs. Google initially determines which emails belongs in which tab. It seems to be based partly on who sent the email and partly on the content of the email. 

  Gmail Inbox Primary icon   PrimaryMessages from friends and family, as well as any other messages that don’t appear in other tabs.
  Gmail Inbox Promotions icon   PromotionsYour deals, offers, and other promotional emails.
  Gmail Inbox Social icon   SocialMessages from social networks, media-sharing sites, online dating services, gaming platforms, and other social websites.
  Gmail Inbox Updates icon  UpdatesNotifications such as confirmations, receipts, bills, and statements.
  Gmail Inbox Forums icon   ForumsMessages from online groups, discussion boards, and mailing lists.

If a message appears in the wrong tab, you simply drag the email up to the correct tab. After you move a message to a different tab, a message above your inbox will ask if you want to undo that action or choose to always put messages from that sender in the tab you chose.


Conversation View

While you are looking at your Gmail settings, you might want to consider turning the conversations feature off. The conversations feature is on by default and it groups all of the emails that relate to the same conversation into a stack automatically for you, with the newest message at the top. A conversation will break off into a new thread if the subject is changed or there are more than 100 messages. Until you get used to it, and some people never seem to get used to it, you can feel that you are losing messages. It can get confusing if you have sent an email to a group and there has been a lot of back and forth messages. 

If you would like to turn the conversation view off, click on the gear icon in the upper right side of the Gmail screen and choose Settings. Scroll on down and click the circle to the left of "Conversation view off".  Whew, I can see many of you relaxing a little bit right now. 

As long as you're in the settings area, scroll on down and review some of the other choices. For those of you who like using keyboard shortcuts, there is a feature to turn them on/off. Clicking on the blue "Learn more" option will reveal a list of all of the keyboard shortcuts you can use in Gmail. There might be other things you can turn on/off to make your life easier. 

Happy Computing


Diane

Don't forget to click the Subscribe to 100 Computer Tips in 100 Days via email link on the right side of the screen so you get email alerts when Diane adds a new post.

Want more tech news or interesting links? You'll get plenty of both if you keep up with Diane McKeever, the writer of 100 Computer Tips in 100 Days, by subscribing to her Facebook posts or visiting her web page, www.dianemckeever.com . 

7/2/13

Tip 105 - Alt Code Reference Sheet

100 (or more) Computer Tips in 100 (or more) Days

Tip #105 - Alt Code Reference Sheet


Have you ever wondered how people inserted special characters such as smiley faces, hearts, arrows, etc. into their emails, Tweets, Facebook posts or worksheets? They probably used Alt codes to accomplish it. 

Alt codes have been around for decades and were used by early programmers. I have compiled a list below for your use. For best results you should save the picture by clicking on it with the right mouse button and choosing "Save Image As" or "Save Picture As" and saving it on your desktop. You can then double click the image on your desktop and print from there. 


After this was posted my Apple friends were very sad that they couldn't do this fun stuff with the Alt key. There are a few alternatives for them that I wanted to include here. Rather than doing a new tip card I've included links to a couple of websites where Apple people can get help on this. Check out this page for accent codes that you accomplish with the Option key, sometimes in concert with the Shift key. Here's a second resource that shows you how to make the Character Palette available to insert special characters. Hope this helps my Apple friends.

Happy Computing!

Diane 


Don't forget to click the Subscribe to 100 Computer Tips in 100 Days via email link on the right side of the screen so you get email alerts when Diane adds a new post.

Want more tech news or interesting links? You'll get plenty of both if you keep up with Diane McKeever, the writer of 100 Computer Tips in 100 Days, by subscribing to her Facebook posts or visiting her web page, www.dianemckeever.com . 

5/20/13

Tip #103 - Bookmarking a Browser Page


100 Computer Tips in 100 Days

Tip #103 - Bookmarking a Browser Page


I spoke with two clients after posting the index for my blog. They both commented that they would bookmark the page if they knew how to do it! Of course the directions depend on which browser you're using. Some refer to Bookmarking as adding to Favorites. What ever it's called, it is the process that allows you to save pages you've gone to in your browser. Generally these pages can be grouped together into folders or listed individually or added to a bookmark/favorites bar. The bookmark/favorites bar appears along the top of your browser window and should be used for webpages you use very frequently such as your email, calendar or facebook page. All of the browsers listed here use Ctrl + d (Command on the Apple) to add bookmark or favorite entries.

Internet Explorer
The Internet Explorer is one of the browsers that uses the term Favorites to help you quickly return to web sites you've visited. To add to the favorites, go to a page you want to add to your favorites list and click the yellow star in the upper right side of your screen. A drop down menu will appear. Click on Add to favorites to add the current page to your favorites list or to the Favorites bar. As you can see from the screen shot on the right, you can also add a page to your favorites list by using the keyboard command of Ctrl + d.


Mozilla Firefox
Mozilla Firefox uses the Bookmark menu to add bookmarks to its browser. Again you go to the page that you would like to bookmark and click on the bookmark menu. From the menu choose "Bookmark This Page". A further dialog box will appear so that you can choose whether this should appear on the bookmark menu or bookmark bar. From this dialog box you can also click on "Choose" to identify a specific folder for the bookmarks to be saved in or click New Folder to create a new folder group. Note in the screenshot to the left there are many folders that help organize saved bookmarks. This really helps if you are researching a topic and want to group your found pages. Note the use of Ctrl + d to add the bookmark using the keyboard.

Google Chrome
Like the Internet Explorer, Google Chrome uses a yellow star to bookmark a page. When you click the yellow star in the upper right side of the page a dialog box appears for you to choose where the bookmark will be saved. You also have an opportunity to edit the name that will appear in the list as well as choose between the bookmark bar or folders. Although it is not documented when you hover over the star, Ctrl + d will bring up the bookmark dialog box.


AOL Browser

Many people log on to AOL through a desktop icon and then use the browser in the AOL program. AOL uses the term Favorites and they use a red heart to add to the favorites menu. When you click the heart a further dialog box appears allowing you to choose where the newly identified page will be stores. Note the Favorites menu at the top right of the screen. Clicking on the Favorites menu gives you access to all of your stored favorites.


Safari
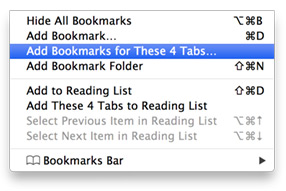
The Safari browser uses the term bookmark. Across the top of the screen you will see the Bookmark menu between History and Window. When you are at a page you would like to add as a bookmark, click the Bookmark menu and choose "Add Bookmark". As you can see from the screenshot, Command + d can be used as well. A further dialog box will allow you to choose whether the bookmark will appear in the menu or on the bookmark bar.

Hope this helps. Don't forget to bookmark those pages in my blog that you would like to revisit, such as the index page.

Happy Computing.

Diane

Don't forget to click the Subscribe to 100 Computer Tips in 100 Days via email link on the right side of the screen so you get email alerts when Diane adds a new post.

Want more tech news or interesting links? You'll get plenty of both if you keep up with Diane McKeever, the writer of 100 Computer Tips in 100 Days, by subscribing to her Facebook posts or visiting her web page, www.dianemckeever.com . 

5/14/13

Tip # 102 - FTP via Skype


100 (or more) Computer Tips in 100 (or more) Days

Tip #102 - FTP via Skype


Recently I had to send a BIG graphic file to China for a client but the file was too big to attach to an email. The provider asked if I had a Skype account (of course I did, how else can I see the grands) so we exchanged Skype names. 

After I had added his name to my contact list and double clicked on the name, I saw the plus sign button. Clicking on it gives you choices that include: Send File, Send Contacts, Share Screens and Add People.  Of course, I was looking to send a file so I chose that option that brought up the standard dialog box to choose the file. Once the file was chosen I then clicked on the Video call button. When the contact accepted the call the download started. A few minutes later a huge file had been transferred from FL to Shanghai, China!!! Isn't the internet a wonderful thing??? 

Hope you enjoyed this tip.

Happy Computing!

Diane

Don't forget to click the Subscribe to 100 Computer Tips in 100 Days via email link on the right side of the screen so you get email alerts when Diane adds a new post.

Want more tech news or interesting links? You'll get plenty of both if you keep up with Diane McKeever, the writer of 100 Computer Tips in 100 Days, by subscribing to her Facebook posts or visiting her web page, www.dianemckeever.com . 

5/12/13

Tip #101 - Recap of the Keyboard Shortcuts


100 Computer Tips in 100 Days

Tip #101 - Recap of the Keyboard Shortcuts


Thank you for taking this journey with me. I hope that you have taken away a few time-saving tips. These tips will be produced in both a book format as well as an interactive PDF complete with video links. I’m working on the videos now and will let you know when they are available.

Happy computing!

Undo
Ctrl + z
Cut
Ctrl + x
Copy
Ctrl + c
Paste
Ctrl + v
Print
Ctrl + p
New
Ctrl + n
Open
Ctrl + o
Save
Ctrl + s
Top of document
Ctrl + Home
End of document
Ctrl + End
Select All
Ctrl + a
View Desktop
Windows + d
Switch Programs
Alt + Tab (Command on Apple)
Find
Ctrl + f
Repeat Action
Ctrl + y
Lock desktop
Windows + l
Opens the Run Program Dialog
Windows Key + r
Minimize all windows
Windows Key + m
Maximize all windows
Windows Key + Shift + M
Find files on your computer
Windows Key + f
Open Windows Explorer/My Computer
Windows Key + e
Duplicate Objects
Ctrl + drag
Help
F1
Remember on the Apple use Command for the Ctrl key.


Happy computing!

Diane


Don't forget to click the Subscribe to 100 Computer Tips in 100 Days via email link on the right side of the screen so you get email alerts when Diane adds a new post.

Want more tech news or interesting links? You'll get plenty of both if you keep up with Diane McKeever, the writer of 100 Computer Tips in 100 Days, by subscribing to her Facebook posts or visiting her web page, www.dianemckeever.com .